Tuesday 31 October 2017

Abandoned village

(The image is completely upside down, Oh well)
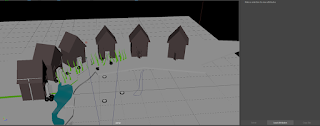
Anyway, the picture of the abandoned village will be based on a corner bend, a few houses, on a curb, with bags of  garbage and tires, with the houses either left open, broken or  just  general damage, to show there's no one around, or at least no one looking after the place.

And now... To explain, piece by piece:

The houses are the same base template, a cube with a prism above it. With a door  frame and a spinnable door, which was achieved by changing the door's pivot point (D key) inside of spinning the door in the center.
But each house has something different,whether it's a broken window or door (Done by boolean difference with the door as the priority,So it doesn't leave a star,  and not a broken door)

Same method for the windows and anything else broken. BUT to make the broken effect, I need a custom mesh, but... Altering a cube is a pain, so instead, I used curves, making them into a flat plane (Which was... Triangles in the shape of the curves)  And then extruding the faces, so it's a 3d object... 

This was also used for the water... Which is using an ocean material, to simulate the moving water effect.

As for the tires and bin bags, they were made from the same prefab, a primative shape (Orb for the bag, cylinder for the 
 tires) And adding the proper materials for the same effect.

And the grass was made from a curve(As the curve on the floor shows) Making it a surface, adding a bright  green material


The curve,was made by extruding and turning the face of a cube,again and again.

But the crack and the missing sections  were made by (How else!) Custom meshes!

Monday 30 October 2017

Making the house

Week 2! Time to work on this house! Now this will involve ALOT of different tools! All of which are incredibly helpful!(don't worry, I won't go complaining)


First off, we have a cube (Which I changed to the specifications to  the right, we want a cuboid, flat on the ground.
Next up, we want to divide the front face into three segments,using the subdivide tool, we want linear, and the V option to be upped to 3.

Next Extrude the two side faces we just made, and pull them out. Creating the C shape. Nothing more,nothing less.


Next, We click on a side face, and double shift click the face next to it, to get all thefaces that  wrap around... Then, divide it by the U value.

Then we subdivide the middle faces of the three rectangles, and divide them into 5, again, linear, by 5.

We then grab the  middle two faces(so 2 and 4) and Extrude them in, giving them depth.

Now we need to make frames, So, with those faces still selected, linear, divide by 3x3,making a 9 square grind on EACH face.

The middle vertical and middle Horizontal (So excluding the corners) Will be thinned, and extruded out, again, giving depth.


Now the roof! First, grab the top faces, extrude it once, but not too far.

NOW... We beegin the complicated portion... This was made using a mixture of the knife tool AND the connect tool (Basically connecting edges by creating a vertices on the edge) BUT the knife tool, allows you to select point on an edge, and a point on an opposite edge, giving MUCH more control. But, the Connect tool DOES come in handy... When you have nearby edges to work with.

Then pull up,and BOOM! A roof!

Door:


Very simple,we divide the front (Lower two lines of faces) into strips of 6 of 2 planes (So 12 planes all together, again subdivide,very easy)


We want  a frame, and what I hose to do was extrude, and target weld the bottom vertices, to get this shape (Alternatively you COULD subdivide again and go about it that way.


Then you extrude, and boom! A frame!...Now, you could do more detail, like a door handle, glass pane windows (Whicha gain,more subdividing, more extruding) But... That seems overly redundant... SO...How do we go from a simple house, to something... I  guess more stylized?
Boom, If you enter smoothing mode (3 key) the model will be turned from the straight faces, to curves (Basically it will change the rendering method. from point to point, to a more curved calculation)


Overall, this task was... An interesting way to introduce different tools... And the house, actually wasn't terrible!


Steering wheel.

Creating the steering wheel

First, we start off with a Cylinder primitive (Something for the middle of the steering wheel, a center point so we have a base around)


Next, we want the steering wheel ring, Nothing complicated, just use a pipe primitive, Make it very wide but thin (To get that tire like look and not... A pipe.) 

And... We're done!... Not really, there's nothing connecting the wheel with the center part, So... We want something going through the center point, Cylinders specifically, And so, we take a cylinder, Put it into place, and then duplicate it, rotating the new cylinder 60 degrees (Roughly) Around the center point, until finished, meaning six cylinders piercing the center...


But now we have 8 meshes, all independant... And we don't want them to be grouped, because we want the mesh to be one solid connected series of vertices and edges.
So, we go to modelling/Mesh/ Boolean. And then we go to union, combining (One by one) each part, until it's one solid steering wheel, one object!.

And... I could have added more detail to the steering wheel (Because this is more nautical than anything, like a steering  wheel for a boat) Like orbs at the ends of the cylinders. Or even go and make a steering wheel for a car... Which would be the same, but, just in the shape of a car wheel, mainly the middle being different, with no extruding pipes. And over all... This was fine, a simple task, Curving the outer ring might have been a better choice aesthetically... But over all, I'd say the process was simple and easy!

Thursday 26 October 2017

Materials.

Materials
Materials are, just that, materials you make your models out of. When you start a scene, you always start with a basic Lambert material ,which is is given to each new object. (WARNING, it doesn't make a new material, it just uses the first default, so if you edit the default, you will affect the future models!) Materials can range from a very basic plastic like Lambert, a shiny metal like Blinn. Changing it's reflective properties, how transparent it is, what colour it is, Hell, even special effects, ray tracing options, and so on!... But those are for another day.

Textures.
Textures... Are complicated. To be very concise, they're customised materials that you pasted a bitmap image over (Or drew it on manually, but same idea). The Textures, are ATTACHED to the material itself, and not the object, so make sure if you put a texture onto a material, that that material isn't shared anywhere else... Otherwise... Weird stuff may happen.


Foggy material.
Now for fog! My actually most beloved feature in Maya. Fog is made from a Volume primative (Which comes with a default fog material, for the volume, the space between the faces and vertices). And you can do... Amazing stuff. From  an actual fog, to even blue glowing fire! It will give you a transparent material that stacks with depth of the object, and not per face. (So it gives a fog effect and not a veil effect.)