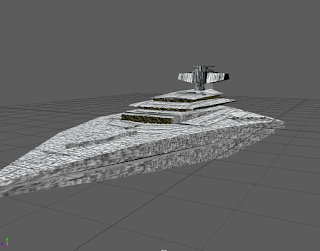
Step one,setting up the blueprints, and the cube...
Centering the cube in the center of the images,allowing for a visual guide for themodel.
First off,extruding the cube, subdividing face to give the triangle shape, reason I didn't use a pyramid was because I believe going from cube to shape is easier than shape to shape...
Next up extruding the sizes to give the small indent in the sides, to follow the instrutions in the blueprints. Which was simply made my selecting the side faces, then subdividing horizontally, and scaling inward (X,Y only)
Next, we need the cockpit, at least that's how I'm identifying it for this process, we have a total of three layers, Which will be made with one mesh, for simplicity, Also so it melds will with the base model below.
Next we'll bemaking the control sector which is connected by a vertical shaft,whichis simply doneby more extruding!
Next up are the side bobbles... Or whatever they're called, simply thing, we're getting a sphere, reducing the poly count until it matches the orbs in the back, followed bysome Cylinders (Again to match the shapes)
Give the orbs a platform, boolean union them until they're one prefab, then stick them into position.
Next up, the engine and exhaust. Which is simply, a cylinder, with one side scaled down to give the cone effect. Extruding the larger circle of the cone, BUT do not pull it, inside scale it down, Extrude again, pull out, scale out, THEN we Extrude one final time, extrude down, and pull in. And that's how you get that shielded rocket kind of look.
As for other details like the rings and the bars, simply Halo's and Cylinders. Nothing too complicated.
And that's the general shape of the Imperial star destroyer! Personally I feel like there should be much much more detail, but I either: Can do it easier with Textures and bump maps. Or the extra modelling work would lead to either complications, or inaccuracies with the model. But over all, I had fun working on this model! Even though issues with the Side of the destroyer gave issues, cuts not connecting properly, and somethings the mesh breaking at points.
If I had to pick something I could have done better, I'd say time management, as I spent a lot of time deciding how to get the body done.Since, while the shape is simple, getting the control cockpit, the extra layers, I wish I could have done it on the actual model itself.
Now, an update... So the star destroyer I made previously was borderline buggy and pretty bad, so for the animation, I decided to completely remake it.
This was made, using the same tactices as before, but with more emphasis on having this model off in the distance. I used Bumpmaps to give the star destroyer more texture, I centered the model's faces so it wasn't lopsided like the other one. Redid all the Textures so it wasn't just one texture wrapping the star destroyer which made it completely ugly. (A top image for any face on top, and a bottom image for the underbelly). More details like lights to represent actual rooms in the star destroyer looking to the outside. Modeled the center a bit more again to be more accurate to a more detailed Star destroyer. But the rest was merely to give it the look from a distance, as you don't get any closer than panning shots from a fair distance, no close up shots involved.
If there was any close up shots, more details like the cannons would have to be actually modeled, the bumps would also have to be fully modelled and not passed onto a texture and a bump map. In reflection, I probably should have taken more time and care with this model, Using my head in how I could have made it look good, and not just aim to fling something "Decent" out. I decided to change the model due to some animation issues, where part of the model wasn't in center... But that was it's center. And instead of dealing with the broken ship, I got rid of it, and remodelled a completely fresh one.


No comments:
Post a Comment